Thursday, October 14, 2010

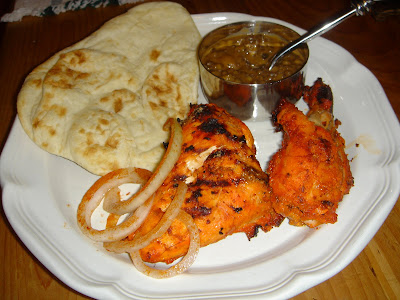
Hot off the Tandoor...

Tandoori Chicken is to Indian cuisine what Jerk is to Jamaican, Tacos are to Mexican and Pasta is to Italians. Despite its humble origins, it has become the uncontested favorite in a cuisine that is vast as well as diverse. The founder of one of Delhi’s oldest and most famous restaurants Moti Mahal lays claim to its original recipe. It all began when he roasted a chicken over wood and charcoal in a hole in the ground. A modern Tandoor is a cylindrical oven made of clay reaching temperatures up to 900° F. Tandoori Roti, which is a type of baked flat bread is commonly cooked alongside the Tandoori and usually served with it.
It is inevitable that anyone who has eaten Indian food has tried the Tandoori Chicken at some point. A well made Tandoori is tender and moist on the inside and crisp on the outside, with an aroma of spices and a distinctly smoky flavor. An attempt to replicate the recipe in a regular gas oven will not have the same results but an open grill works well. It is the brick red color of the Tandoori that makes it easily identifiable and in a strange way makes it so much more appetizing. I tried the same recipe without the color and it didn't turn out quite the same, proving that we do "eat with our eyes first".
Recipe for Tandoori Chicken:
1 chicken cut into large sections
juice of 1 lemon
1 teaspoon salt
1/2 cup plain yogurt
1 tablespoon ginger paste
1 tablespoon garlic paste
1 teaspoon Garam Masala powder
pinch of red food color
1 tablespoon oil or melted butter
1 teaspoon salt
1 tablespoon melted butter
1 teaspoon Chaat Masala


Rinse the chicken pieces and pat dry. Rub it all over with the salt and lemon juice and set aside for 1/2 an hour. Combine the remaining ingredients and rub the chicken with it. Marinate the chicken for a few hours at least or preferably overnight. Grill over an open flame, basting with any left over marinade. Serve hot brushed lightly with melted butter and sprinkled with chaat masala.
A word of caution when using red food color- Buy it at the Indian grocery store. Do not use food color intended for cookies or you may end up with a psychedelic pink Tandoori Chicken!

Wednesday, October 13, 2010


Satay is ubiquitous to South East Asia and almost every country in the region has its own version of this versatile dish. Although Chicken Satay seems to be widely popular here in the West, one is likely to find beef, fish, tofu, pork and goat as the source of protein quite often in the East. It is a common misconception that Satay is of Thai origin based on the fact that every Thai restaurant is likely to have it on their menu. It is in fact a mainstay in Indonesia, Malaysia and Singapore. Relatively easy to prepare and inexpensive - the Satay is often a meal and not the mere appetizer we tend to associate it with. Lamb Satay which originated in the islands to the Northeast of Java is considered the most popular in Indonesia. Malaysians have their own trademark of basting the meat with oil using a brush made of lemongrass as it grills.
There's no denying that it is a great finger food but it contributes well to a family style meal too. A hearty bowl of soup or rice and a platter of Satay and you're off to a good start!

Recipe for Chicken Satay:

1 lb Chicken cut into bite size pieces
1 inch piece of galangal
1 cilantro root
1 clove garlic
1 stem lemon Grass
1 teaspoon coriander powder
1 teaspoon cumin powder
1 teaspoon turmeric powder
1 teaspoon curry powder
½ cup coconut cream
1 teaspoon sugar
1 teaspoon salt
Grind the galangal and cilantro root to a fine paste. Add in the dry spices. Combine the remaining ingredients. Marinade for half an hour. Skewer the meat. Grill over an open fire and baste with the marinade to keep the meat moist. Serve with Satay sauce.

Satay Sauce
1 tablespoon red curry paste
1 cup coconut milk
¼ cup crunchy peanut butter
2 tablespoons tamarind juice (equal parts tamarind paste and water boiled briefly).
1 tablespoon sugar
Salt to taste
1 tablespoon oil
Heat the oil and sauté the curry paste. Add in the remaining ingredients and lower the heat. Adjust the salt and sugar and simmer till it thickens. It should coat the back of a spoon.

Saturday, October 9, 2010

Breaking Bread

"Good bread is the most fundamentally satisfying of all foods; and good bread with fresh butter, the greatest of feasts."James Beard (1903-1985)
It is probably not in my best interest to lobby bread at a time when low carb diets have become the way of life. While I have my opinions regarding the adverse effects of carbohydrates, I am a firm believer of " everything in moderation". If you are going to eat a piece of bread, why not ensure that it's good?

I've baked for as long as I can remember but bread has never been part of my repertoire. Recently I gave into a sudden urge and tried a bread recipe and the results were fantastic. The shocker was how easy it is once you get started. Working with yeast takes a bit of practise but as long as you get it to bubble and froth the way it's supposed to, there shouldn't be a problem. It is also important to use the right kind of flour- it makes a big difference to the quality of the bread. There is some wait time between the various steps but once they come out of the oven, those babies will make you so proud.

I intend to try many more bread recipes but today's is a simple bread roll recipe. You can shape it whichever way you want or even stick it into a loaf tin - end results are good either way.

Recipe for Bread Rolls:
4 cups Bread flour
7 gms dry yeast
1 tablespoon sugar
1/2 cup warm water
1 teaspoon salt
2 tablespoons dried milk powder
1 tablespoon sugar
about 1 cup warm water
1/4 cup vegetable oil
Start by stirring the tablespoon of sugar into the 1/2 cup warm water and adding in the yeast. Place in a warm spot close to the stove( do not heat it) until the mixture appears to grow and froth. This should take about 10 minutes. If it fails, throw it out and try again.

Next, sift the flour into a large bowl and using the dough hook of the mixer or a wooden spoon combine the yeast mixture, salt, sugar and milk powder into it. Make a well in the center and pour in the oil, yeast mixture and warm water. Knead well for about 10 minutes or until the dough is smooth and elastic. Make into a ball, place it in a lightly greased bowl and cover with a plastic wrap till it doubles in size. Preheat the oven to 415° F( 210°C).
Once the dough is double its volume, punch it down, and knead for another minute or so.( Great therapy) Shape and glaze the dough with an egg wash. An egg wash is a mixture of 1 egg and 1 tablespoon milk whisked together. Brushing this on before baking, gives the bread a rich color. Bake on greased trays or tins for 10 minutes, reduce the temperature to 350° F ( 180°C) and bake for another 30- 40 minutes.

Note: Do not substitute bread flour with all purpose flour- end results will be lumpy and dense. Black or white sesame seeds scattered over the tops add flavor and interest to the rolls.

Friday, October 8, 2010

Eggs Benedict- Brunch is on...

There is much debate on the benefits of eggs and egg yolks have developed a bad rap for being the cause of every conceivable disease. On the other hand, enthusiasts claim the yolk is nutrition packed and go so far as to equate it to a multivitamin. I’m on the fence on this one but when I see Eggs Benedict on a menu all theories go out the window.
Breakfast has never been my favorite meal. I am not a fan of sugary treats first thing in the morning, so most days I stick with granola or oats. Brunch on the other hand is decidedly a favorite. A well made Mimosa in hand and all bets are off.

Balthazar’s is a hot spot for brunch in New York; the long wait time and slightly stand-offish crew notwithstanding, the meal is inevitably memorable. I can’t downplay the fact that the décor and the ambiance do their part in creating a worthwhile experience but the quality of the food itself is excellent.

Eggs Benedict is made with toasted English muffins topped with Canadian bacon or ham, topped with poached eggs. A Hollandaise sauce gives the dish its characteristic creamy, rich mouth feel. It is relatively easy to prepare and a great way to present an inexpensive meal. The tricky part is making a good Hollandaise. This sauce brings back disturbing memories of my early culinary school days when I had to go through several cases of eggs and butter to get it right. Nightmarish as it may sound, there was certain satisfaction to be derived from successfully making a smooth and creamy Hollandaise.

Recipe for Hollandaise:
3 egg yolks
1 tablespoon lemon juice
1/2 cup melted butter
1/2 teaspoon salt
pinch of Cayenne pepper

Whisk the egg yolks and the lemon juice in a bowl with a hand mixer till it has thickened to twice its volume. Place over a pot of boiling water, making sure that the bowl is not touching the water. Continue whisking and add in the melted butter in a slow stream making sure that the mixture does not get too hot, or the eggs will scramble( speaking from experience).
When the sauce is thick and twice the original volume add in the salt and cayenne pepper.Taste and adjust seasoning. Cover and keep warm until ready to use. Use up any leftovers the same day.

Tip: Hollandaise can be served with steak and tastes great over blanched Asparagus.

Wednesday, October 6, 2010

Hello Cupcake

Cupcake mania has swept in and taken a stronghold on Americans lately. Every city has sprouted at least a few specialty shops with an array of cupcakes that are varied in size, shape and flavor. They can be as mundane as a vanilla cupcake or as outrageous as a gin and tonic cupcake. They also vary in size; some are exquisitely frosted and bite-sized while others may be fairly large with a mountain of icing that is likely to send blood sugar levels shooting straight up.

In February ( My son Neil's 9th birthday) I baked 2 dozen cupcakes for his class. I asked him to pick a flavor for the cake and a type of frosting. Being an out and out chocoholic he picked a chocolate cupcake off course. He seemed to have his heart set on a marshmallow frosting for the chocolate cupcakes so the decision was easy. Needless to say marshmallow frosting is extremely sticky and I was getting a fair bit of it on my face, hands and all over the counter tops. The cupcakes looked lovely and the frosting was sensational. I have a pet peeve about overly sweet confectionery and so was pleasantly surprised that marshmallow frosting has just the right amount of sweetness. The tricky part was - cleaning up. I made sure to include a few extras for his teacher to soften the blow- I could see her trying to clean up the classroom after this treat ! Nevertheless Neil came home happily to report that all his friends ( and his teachers)loved the cupcakes and licked their fingers clean.

Cupcakes are versatile,portable and they suit almost any occasion. No party or celebration is complete without them and these days it is not uncommon to bring them back home as a party favor. I feel compelled to post a picture of these adorable cupcakes made by Shabnam, sporting fondant pacifiers, foot prints and cuddly babies, perfect for my friend Abon's baby shower. Similarly there are themes to match every conceivable event or celebration and there are entire websites dedicated to keeping it fun and creative.
Recipe for Marshmallow Frosting:
To cover 12 cupcakes
2 egg whites
6 Tablespoons water
1 cup sugar
1 Tablespoon corn syrup
1/2 teaspoon cream of tartar
1 cup marshmallows( mini)
1 teaspoon vanilla essence
pinch salt
Set a large bowl over a saucepan of boiling water( the bowl should not touch the water). Whisk together in that bowl everything but the vanilla and the marshmallows. Whisk till the mixture is at 160°F and the sugar is melted. Beat the mixture with a hand held mixer till it forms soft peaks. Add in the marshmallows and vanilla and beat on low till it is smooth. Use immediately.

Monday, October 4, 2010

Mise en place


"Mise en place "is an indispensable step to creating a great meal. You may wonder why I am suddenly throwing culinary mumbo jumbo at you, but believe me when I say that most of us may have attempted it at some point if not every time we cook. Pronounced meez ahn plahs, it is defined as "everything in place". Simply put, it implies all the measuring, chopping , peeling,cleaning and preparing of the ingredients for a specific recipe prior to cooking. All professional kitchens dedicate a large part of their time to the organizing of ingredients before the actual cooking begins. It is imperative to have everything on hand before starting the cooking process to avoid leaving out important ingredients and also to use time more effectively. Most chefs swear by it and adhere to it religiously. So all you home cooks should give it a shot and you may never have to run to the store when you start to bake a cake and realise you're fresh out of eggs!
It also means that you should have your equipment ready. A cold oven is of no use if your cake is ready to go in, and nor is a cold pan for sauteing. It can be most aggravating when you can't find your tongs and your beautifully caramelized chicken breasts are starting to look like chunks of charred wood.
Reality cooking shows are all the rage these days. Dishes are prepared in record time and we may attribute that to the magic of editing but the truth behind it is -mise en place. A well done mise en place is a thing of beauty and the next time you are out at a good restaurant with a show kitchen, sneak a peak at the cooks and you will see them armed with a plethora of mise en place.
It makes cooking so much easier, quicker and the end results are undoubtedly tastier. Moral of the story- peel and chop your garlic before you dive right in....

Sunday, September 26, 2010

Kathi Rolls - the ultimate hangover antidote

Kathi Rolls are India's answer to a juicy burger. The perfect late night/early morning snack for the sleep deprived and over indulged party animal that we have all morphed into at some point in our lives. A Kathi roll is basically a fried flat bread stuffed with an omelet, grilled meat or chicken, sliced onions and mint sauce. Vegetarians have created their own versions with paneer ( Indian Cheese) or mashed potato as they are apt to do, but the real deal is a mouthful of succulent mutton or chicken kebab with a greasy and utterly delicious paratha (fried bread)wrapped around it.
Although the history of its origins remains a little murky, legend has it that the Kathi Roll evolved long ago in British India when a particularly uptight Officer thought it was beneath him to touch the food with his fingers. Hence a resourceful little Indian man put it in a wrap and even put a square piece of parchment paper at one end to hold onto it. Kolkata in Eastern India has claimed ownership over the Kathi Roll and Kolkatan's swear that Nizams Roll are the best. (Nizams is a restaurant in Kolkata, famous for it's Kathi Rolls.)
Lately the Kathi Roll craze has spread as far as Manhattan. It is almost ritualistic for New Yorkers to hang out in the Village and end the evening at the Kathi Roll Company at 2 A.M. But since I live in the boonies- I have little choice but to make my own.

Recipe for Kathi Rolls:

Marinade:
1 lb boneless lamb or chicken cut into bite sized cubes
2 tsp ginger paste
2 tsp garlic paste
1 tsp chili powder
1tsp ground coriander
1/2 tsp ground cumin
1 tsp garam masala powder
1 tsp salt
1/2 cup plain yogurt

Combine all these ingredients in a large bowl and marinade the meat for a few hours or preferably overnight. Skewer the meat and grill.

For the Paratha:
4 cups all purpose flour
1/4 cup oil
water
1/2 tsp salt
4 eggs whipped with 1/2 tsp salt.

Combine the salt, flour and the oil briefly. Adding a little water at a time, knead it into a soft pliable dough. The dough should not be tough or sticky. Grease the dough with a little oil , cover and keep until ready to use. Form 8 balls of a uniform size and roll them out to parathas 6 - 8 inches in diameter. Heat a non stick pan and place the paratha on it . When one side is cooked flip over and drizzle with 1/2 tsp of oil along its edges. Pour 2 tbsp egg over the paratha, spreading it out with the back of a ladle and flip it over. Repeat till all the dough is used up.


To assemble:
thinly sliced onions
mint sauce ( Make your own or buy a jar at the Indian grocery store)
1 tbsp oil
1 tsp chaat masala

Just before serving heat the oil in a pan and saute the meat and the onions briefly. Sprinkle over wiht the Chaat Masala and place the filling down the center of each paratha. Roll it up and serve with the mint Sauce.