Thursday, October 28, 2010

"Roast chicken, plump and juicy, is perfect for anything from a feast to a weekday family dinner"- Alice Waters
There is nothing quite as delicious as a well roasted chicken considering how easy it is to prepare.
A whole roast chicken with roasted vegetables on the side makes a healthy and hearty meal in a pot and the leftovers can be used in many different ways. I use leftover chicken by shredding it into soups or salads but my favorite thing is the chicken wrap. These wraps are great for a quick lunch and keep well for a school lunch box. They are versatile - the ingredients can be altered to suit ones tastes; for instance avocado and sour cream can be used instead of the sun dried tomato and pesto. They are great for picnics or a day at the beach or simply for a quick fix meal for an unexpected guest. To change it up I sometimes use roasted corn and black beans with a fresh salsa and the roast chicken to make a Tex Mex style wrap. The possibilities are endless and the results are always well appreciated.

Recipe for Chicken Wraps:
2 Flour Tortillas
1 Roast chicken breast cut into slices
1 tsp Pesto
2-3 sun dried tomato in oil
2 romaine lettuce leaves
4 slices cheese (optional)
Toast the tortillas lightly and place a lettuce leaf inside each. Place the chicken slices over each lettuce leaf. Dice the sun dried tomato and sprinkle over the chicken along with a few drops of pesto. Layer the cheese slices over it and roll up the tortillas. Cut each wrap in half, at an angle and plate up.
Recipe for Roast chicken:
1 roasting chicken
2-3 tbsp butter
salt and pepper
6 cloves garlic
1 onion
fresh rosemary leaves
Rinse the chicken inside and out and pat dry with paper towels. Place it on a baking tray, cut 6 slits in the fleshy parts and insert a clove of garlic in each. Melt the butter and brush the chicken with it. Sprinkle with salt and pepper and sprinkle with some of the rosemary leaves. Place the onion and some of the rosemary inside the cavity of the bird. Roast at 350°F for about an hour or until the chicken is golden brown.

Tuesday, October 26, 2010

It's getting Chili...

Fall here in North America is amazingly beautiful. It is my favorite time of the year but today has been particularly damp and blustery and I was prompted to turn on the fireplace and cook up a batch of Chili. Chili Con Carne, which translates to "Chili with meat" originated in San Antonio Texas and although a great deal of controversy surrounds its origins, most people agree that it is a wholesome meal in a bowl. Chili is a stew made with ground meat - ground beef, chicken, turkey or sausage meat. Beans are an important component of this dish. A well made bowl of Chili can be served over rice or baked potatoes,with grilled cheese sandwiches or over a hot dog. Toppings range anywhere from a dollop of sour cream and grated cheddar to sliced jalapeno peppers. There are literally thousands of different ways to cook a good pot of chili but I created my own, mostly through trial and error...

Recipe for Chili con Carne
1 lb ground sirloin or protein of choice
1 large yellow onion diced
2 tbsp vegetable oil
6 cloves of garlic minced
1 red pepper diced
1 green pepper diced
11/2 tsp chili powder
2 tsp ground cumin
1 tsp freshly ground black pepper
1 tablespoon dried Oregano
salt to taste
2 cups chicken stock
1 can red kidney beans
1 can refried beans

Heat the oil in a heavy bottomed pan and saute the onions, garlic and beef. Once the meat is browned, add in the peppers and seasonings.
(If you are using a crock pot to slow cook the chili, transfer it at this point) Add in the chicken stock and the can of kidney beans. Cover and simmer on low for up to 2 hours, stirring occasionally. Once the chili has cooked add in the refried beans and cook for another 2 hours.
Tast and adjust the salt. Serve hot.

Note: To turn up the heat- add more chili powder or cut up some jalapeno peppers and saute with the onions.

Friday, October 22, 2010

To eat or not to eat?

Birthdays become less relevant to me as I get older but every year I summon enough enthusiasm to play it out because of my kids. Their excitement is contagious and a fancy dinner is imminent. That's the one day I am not allowed to cook( enter the kitchen). I surrender quite easily and scout for a likely restaurant. Last night we decided upon Garces Trading Company which opened in Philly earlier this year. It was, to say the least, a bit of a surprise. We entered and stood off to one side because the hostess was very busy; she didn't have the time to acknowledge our presence even with a nod. The decor was interesting, rustic with an old world touch, but the menu was the deal breaker. I am not a fan of pizza and pasta and most of the menu was about that, albeit discreetly. It has been reviewed positively for the most part, but if I am out to eat I want real food ! We debated going or staying. Unfortunately the deafening noise level in the dining area and the particularly indifferent staff helped us make up our minds quite quickly and soon we were back out on the street.
Since the car was safely parked we walked towards Rittenhouse Square and spotted Le Bec Fin another of Philly's most revered restaurants. This time the Hostess was very friendly and the menu was definitely a lot more exciting. Behind the hostess station I caught glimpses of white tablecloths, wine glasses and food- lots of delicious food! However to our disappointment she ushered us downstairs to a basement level bar with a bunch of little tables which were being set up before our eyes. It did not smell or look remotely like the upstairs and so I was forced to question why we did not deserve a table upstairs. She stated that "denim" was not an accepted dress form there- both my sons were in jeans with collared shirts. We were back out on the street.

We ended up at the Parc, a French Bistro style Steven Starr establishment where we were greeted and seated within minutes. A couple of glasses of Cabernet Sauvignon helped lift the spirits( pun intended) and the dessert menu was enough to cheer anybody up. Beef Bourguignon (that can be eaten with just a fork), juicy Hangar steaks, Roast chicken au jus, Macaroni gratin, creamy mashed potatoes - now that's food... followed by Tarte Au Chocolat, Creme Brulee and Tarte Au Citron. Great food, great ambiance and great service. We rolled out of there happy!!

Tuesday, October 19, 2010

Jap Chae- suck it up the Korean way!

Ever since my neighbor Sarah (of Korean origin) lent me her favorite cookbook entitled "Discovering Korean Cuisine", I became intent on trying to make Jap Chae -a noodle dish involving an array of veggies and thinly sliced beef. It seemed to be a fairly simple exercise and the vivid colors of the vegetables screamed -HEALTHY! So I began by driving down to the local Korean store and picking up the meat, noodles, pak choy and bean sprouts. This dish requires copious amounts of Sesame oil and Soy sauce and little else as far as seasonings go. I would recommend adding in some crushed garlic while frying the meat although this particular recipe did not call for it. Also have a pair of kitchen scissors handy to cut up the noodles- these potato noodles are impossibly slippery and super long. This dish falls easily into the comfort food category in my humble opinion since it has a hearty combination of starch and vegetables and is not too flamboyant in taste. The upside is that it cooks literally within minutes if you have the mise en place ready.

Recipe for Jap Chae :

8 ozSweet potato Vermicelli cooked al dente ( firm to the bite)
1/2 lb beef tenderloin sliced thinly( Optional)
1 onion sliced
1 tbsp garlic paste
8 shitake mushrooms sliced
1 bell pepper sliced
2 green onions sliced
3 cups pak choy or spinach
2 carrots julienned
1 cup of bean sprouts
2 tbsp soy sauce
2 tbsp sesame oil
1 tbsp vegetable oil
salt to taste
Heat the vegetable oil and stir fry the beef and garlic briefly. Add in all the vegetables except the bean sprouts, soy sauce and sesame oil. Stir fry quickly over high heat and adjust seasoning. Serve garnished with the bean sprouts. For those who like hot food - a tablespoon of chili sauce can be added in while stir frying.

Sunday, October 17, 2010

Apero Dinatoire


Food trends, like Haute Couture most often originate in France. In fact the French seem to have exceptional radar for discovering novel ideas and unwittingly re-inventing the wheel. Lately the French have abandoned the formal dinner party for Apero Dinatoire or Appetizer Buffet which is an assortment of bite sized appetizers served almost continuously during a soirée. The idea is to drink and simultaneously nosh on tasty bits and pieces while one mingles, rather than being seated at a table with a traditional dinner. It is not unlike Spanish Tapas and is often skewered, sandwiched or layered to facilitate the use of fingers to pick up the food. Variety and keeping the dishes light are key to hosting a successful Apero Dinatoire. The range of the canapés is often diverse and caters to individual preferences, and the artistically inclined can create platters of amazing color and texture; a veritable artist with a blank canvas so to speak…

Up until recently, it was traditional to serve up an Amuse Bouche during the course of a meal (which translates to “to please the mouth”) consisting of a bite sized appetizer primarily used to showcase the chefs skills or Hors D’œuvres which are appetizers served before the main meal. Apero Dinatoire uses the same techniques but is a full fledged meal in itself. My predilection for small plates made it easy for me to embrace this concept with sufficient enthusiasm. A maternal Uncle and Aunt (die hard foodies) have made Dordogne in the South West of France their favorite haunt. Nestled in a medieval village with an unspoilt natural beauty, the couple have befriended the locals and exchanged lavish Apero Dinaoire's. I first heard about it from them but as hard as I looked, found absolutely nothing on the subject on the internet or in any cookbook in the English language. They obliged with pretty pictures and a list of items on their menu.
Quail eggs stuffed with Mayo & chives,
Cherry tomatoes stuffed with cream & herb cheese,
Thinly sliced courgette marinated and rolled with parma Ham and smoked Duck slices
Tomatillo & orange with honey & Feta cheese
Tartlets with prawn &mango / smoked salmon /humus &cucumber
Polenta slices with Tomato and aubergine / smoked salmon
Pork or duck pate with onion relish or chilly jelly
Potato pancake (blinis) with cucumber& smoked salmon /Tamari & cucumber/
Prawns in Marie Rose (Brit condiment made of ketchup and Mayo)
Individual apple crumble with creme fraiche
Ginger sorbet


Thursday, October 14, 2010

Hot off the Tandoor...

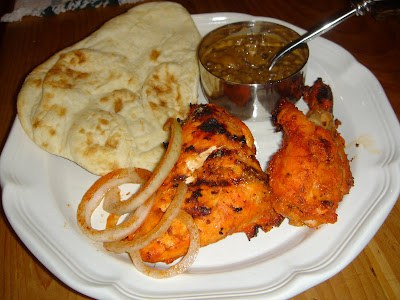
Tandoori Chicken is to Indian cuisine what Jerk is to Jamaican, Tacos are to Mexican and Pasta is to Italians. Despite its humble origins, it has become the uncontested favorite in a cuisine that is vast as well as diverse. The founder of one of Delhi’s oldest and most famous restaurants Moti Mahal lays claim to its original recipe. It all began when he roasted a chicken over wood and charcoal in a hole in the ground. A modern Tandoor is a cylindrical oven made of clay reaching temperatures up to 900° F. Tandoori Roti, which is a type of baked flat bread is commonly cooked alongside the Tandoori and usually served with it.
It is inevitable that anyone who has eaten Indian food has tried the Tandoori Chicken at some point. A well made Tandoori is tender and moist on the inside and crisp on the outside, with an aroma of spices and a distinctly smoky flavor. An attempt to replicate the recipe in a regular gas oven will not have the same results but an open grill works well. It is the brick red color of the Tandoori that makes it easily identifiable and in a strange way makes it so much more appetizing. I tried the same recipe without the color and it didn't turn out quite the same, proving that we do "eat with our eyes first".
Recipe for Tandoori Chicken:
1 chicken cut into large sections
juice of 1 lemon
1 teaspoon salt
1/2 cup plain yogurt
1 tablespoon ginger paste
1 tablespoon garlic paste
1 teaspoon Garam Masala powder
pinch of red food color
1 tablespoon oil or melted butter
1 teaspoon salt
1 tablespoon melted butter
1 teaspoon Chaat Masala


Rinse the chicken pieces and pat dry. Rub it all over with the salt and lemon juice and set aside for 1/2 an hour. Combine the remaining ingredients and rub the chicken with it. Marinate the chicken for a few hours at least or preferably overnight. Grill over an open flame, basting with any left over marinade. Serve hot brushed lightly with melted butter and sprinkled with chaat masala.
A word of caution when using red food color- Buy it at the Indian grocery store. Do not use food color intended for cookies or you may end up with a psychedelic pink Tandoori Chicken!

Wednesday, October 13, 2010


Satay is ubiquitous to South East Asia and almost every country in the region has its own version of this versatile dish. Although Chicken Satay seems to be widely popular here in the West, one is likely to find beef, fish, tofu, pork and goat as the source of protein quite often in the East. It is a common misconception that Satay is of Thai origin based on the fact that every Thai restaurant is likely to have it on their menu. It is in fact a mainstay in Indonesia, Malaysia and Singapore. Relatively easy to prepare and inexpensive - the Satay is often a meal and not the mere appetizer we tend to associate it with. Lamb Satay which originated in the islands to the Northeast of Java is considered the most popular in Indonesia. Malaysians have their own trademark of basting the meat with oil using a brush made of lemongrass as it grills.
There's no denying that it is a great finger food but it contributes well to a family style meal too. A hearty bowl of soup or rice and a platter of Satay and you're off to a good start!

Recipe for Chicken Satay:

1 lb Chicken cut into bite size pieces
1 inch piece of galangal
1 cilantro root
1 clove garlic
1 stem lemon Grass
1 teaspoon coriander powder
1 teaspoon cumin powder
1 teaspoon turmeric powder
1 teaspoon curry powder
½ cup coconut cream
1 teaspoon sugar
1 teaspoon salt
Grind the galangal and cilantro root to a fine paste. Add in the dry spices. Combine the remaining ingredients. Marinade for half an hour. Skewer the meat. Grill over an open fire and baste with the marinade to keep the meat moist. Serve with Satay sauce.

Satay Sauce
1 tablespoon red curry paste
1 cup coconut milk
¼ cup crunchy peanut butter
2 tablespoons tamarind juice (equal parts tamarind paste and water boiled briefly).
1 tablespoon sugar
Salt to taste
1 tablespoon oil
Heat the oil and sauté the curry paste. Add in the remaining ingredients and lower the heat. Adjust the salt and sugar and simmer till it thickens. It should coat the back of a spoon.

Saturday, October 9, 2010

Breaking Bread

"Good bread is the most fundamentally satisfying of all foods; and good bread with fresh butter, the greatest of feasts."James Beard (1903-1985)
It is probably not in my best interest to lobby bread at a time when low carb diets have become the way of life. While I have my opinions regarding the adverse effects of carbohydrates, I am a firm believer of " everything in moderation". If you are going to eat a piece of bread, why not ensure that it's good?

I've baked for as long as I can remember but bread has never been part of my repertoire. Recently I gave into a sudden urge and tried a bread recipe and the results were fantastic. The shocker was how easy it is once you get started. Working with yeast takes a bit of practise but as long as you get it to bubble and froth the way it's supposed to, there shouldn't be a problem. It is also important to use the right kind of flour- it makes a big difference to the quality of the bread. There is some wait time between the various steps but once they come out of the oven, those babies will make you so proud.

I intend to try many more bread recipes but today's is a simple bread roll recipe. You can shape it whichever way you want or even stick it into a loaf tin - end results are good either way.

Recipe for Bread Rolls:
4 cups Bread flour
7 gms dry yeast
1 tablespoon sugar
1/2 cup warm water
1 teaspoon salt
2 tablespoons dried milk powder
1 tablespoon sugar
about 1 cup warm water
1/4 cup vegetable oil
Start by stirring the tablespoon of sugar into the 1/2 cup warm water and adding in the yeast. Place in a warm spot close to the stove( do not heat it) until the mixture appears to grow and froth. This should take about 10 minutes. If it fails, throw it out and try again.

Next, sift the flour into a large bowl and using the dough hook of the mixer or a wooden spoon combine the yeast mixture, salt, sugar and milk powder into it. Make a well in the center and pour in the oil, yeast mixture and warm water. Knead well for about 10 minutes or until the dough is smooth and elastic. Make into a ball, place it in a lightly greased bowl and cover with a plastic wrap till it doubles in size. Preheat the oven to 415° F( 210°C).
Once the dough is double its volume, punch it down, and knead for another minute or so.( Great therapy) Shape and glaze the dough with an egg wash. An egg wash is a mixture of 1 egg and 1 tablespoon milk whisked together. Brushing this on before baking, gives the bread a rich color. Bake on greased trays or tins for 10 minutes, reduce the temperature to 350° F ( 180°C) and bake for another 30- 40 minutes.

Note: Do not substitute bread flour with all purpose flour- end results will be lumpy and dense. Black or white sesame seeds scattered over the tops add flavor and interest to the rolls.

Friday, October 8, 2010

Eggs Benedict- Brunch is on...

There is much debate on the benefits of eggs and egg yolks have developed a bad rap for being the cause of every conceivable disease. On the other hand, enthusiasts claim the yolk is nutrition packed and go so far as to equate it to a multivitamin. I’m on the fence on this one but when I see Eggs Benedict on a menu all theories go out the window.
Breakfast has never been my favorite meal. I am not a fan of sugary treats first thing in the morning, so most days I stick with granola or oats. Brunch on the other hand is decidedly a favorite. A well made Mimosa in hand and all bets are off.

Balthazar’s is a hot spot for brunch in New York; the long wait time and slightly stand-offish crew notwithstanding, the meal is inevitably memorable. I can’t downplay the fact that the décor and the ambiance do their part in creating a worthwhile experience but the quality of the food itself is excellent.

Eggs Benedict is made with toasted English muffins topped with Canadian bacon or ham, topped with poached eggs. A Hollandaise sauce gives the dish its characteristic creamy, rich mouth feel. It is relatively easy to prepare and a great way to present an inexpensive meal. The tricky part is making a good Hollandaise. This sauce brings back disturbing memories of my early culinary school days when I had to go through several cases of eggs and butter to get it right. Nightmarish as it may sound, there was certain satisfaction to be derived from successfully making a smooth and creamy Hollandaise.

Recipe for Hollandaise:
3 egg yolks
1 tablespoon lemon juice
1/2 cup melted butter
1/2 teaspoon salt
pinch of Cayenne pepper

Whisk the egg yolks and the lemon juice in a bowl with a hand mixer till it has thickened to twice its volume. Place over a pot of boiling water, making sure that the bowl is not touching the water. Continue whisking and add in the melted butter in a slow stream making sure that the mixture does not get too hot, or the eggs will scramble( speaking from experience).
When the sauce is thick and twice the original volume add in the salt and cayenne pepper.Taste and adjust seasoning. Cover and keep warm until ready to use. Use up any leftovers the same day.

Tip: Hollandaise can be served with steak and tastes great over blanched Asparagus.

Wednesday, October 6, 2010

Hello Cupcake

Cupcake mania has swept in and taken a stronghold on Americans lately. Every city has sprouted at least a few specialty shops with an array of cupcakes that are varied in size, shape and flavor. They can be as mundane as a vanilla cupcake or as outrageous as a gin and tonic cupcake. They also vary in size; some are exquisitely frosted and bite-sized while others may be fairly large with a mountain of icing that is likely to send blood sugar levels shooting straight up.

In February ( My son Neil's 9th birthday) I baked 2 dozen cupcakes for his class. I asked him to pick a flavor for the cake and a type of frosting. Being an out and out chocoholic he picked a chocolate cupcake off course. He seemed to have his heart set on a marshmallow frosting for the chocolate cupcakes so the decision was easy. Needless to say marshmallow frosting is extremely sticky and I was getting a fair bit of it on my face, hands and all over the counter tops. The cupcakes looked lovely and the frosting was sensational. I have a pet peeve about overly sweet confectionery and so was pleasantly surprised that marshmallow frosting has just the right amount of sweetness. The tricky part was - cleaning up. I made sure to include a few extras for his teacher to soften the blow- I could see her trying to clean up the classroom after this treat ! Nevertheless Neil came home happily to report that all his friends ( and his teachers)loved the cupcakes and licked their fingers clean.

Cupcakes are versatile,portable and they suit almost any occasion. No party or celebration is complete without them and these days it is not uncommon to bring them back home as a party favor. I feel compelled to post a picture of these adorable cupcakes made by Shabnam, sporting fondant pacifiers, foot prints and cuddly babies, perfect for my friend Abon's baby shower. Similarly there are themes to match every conceivable event or celebration and there are entire websites dedicated to keeping it fun and creative.
Recipe for Marshmallow Frosting:
To cover 12 cupcakes
2 egg whites
6 Tablespoons water
1 cup sugar
1 Tablespoon corn syrup
1/2 teaspoon cream of tartar
1 cup marshmallows( mini)
1 teaspoon vanilla essence
pinch salt
Set a large bowl over a saucepan of boiling water( the bowl should not touch the water). Whisk together in that bowl everything but the vanilla and the marshmallows. Whisk till the mixture is at 160°F and the sugar is melted. Beat the mixture with a hand held mixer till it forms soft peaks. Add in the marshmallows and vanilla and beat on low till it is smooth. Use immediately.

Monday, October 4, 2010

Mise en place


"Mise en place "is an indispensable step to creating a great meal. You may wonder why I am suddenly throwing culinary mumbo jumbo at you, but believe me when I say that most of us may have attempted it at some point if not every time we cook. Pronounced meez ahn plahs, it is defined as "everything in place". Simply put, it implies all the measuring, chopping , peeling,cleaning and preparing of the ingredients for a specific recipe prior to cooking. All professional kitchens dedicate a large part of their time to the organizing of ingredients before the actual cooking begins. It is imperative to have everything on hand before starting the cooking process to avoid leaving out important ingredients and also to use time more effectively. Most chefs swear by it and adhere to it religiously. So all you home cooks should give it a shot and you may never have to run to the store when you start to bake a cake and realise you're fresh out of eggs!
It also means that you should have your equipment ready. A cold oven is of no use if your cake is ready to go in, and nor is a cold pan for sauteing. It can be most aggravating when you can't find your tongs and your beautifully caramelized chicken breasts are starting to look like chunks of charred wood.
Reality cooking shows are all the rage these days. Dishes are prepared in record time and we may attribute that to the magic of editing but the truth behind it is -mise en place. A well done mise en place is a thing of beauty and the next time you are out at a good restaurant with a show kitchen, sneak a peak at the cooks and you will see them armed with a plethora of mise en place.
It makes cooking so much easier, quicker and the end results are undoubtedly tastier. Moral of the story- peel and chop your garlic before you dive right in....